In 1560, an Imagawa army of about 25,000 men sat down to a victory feast in a wooded valley west of Nagoya. About 2,000 Oda men were creeping through a thunderstorm toward them. The force ratio was roughly one to twelve.
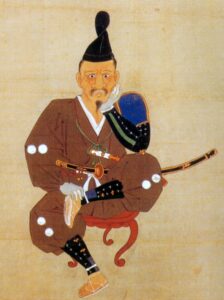
Two hours later Imagawa Yoshimoto was dead, his head was rolling somewhere on the slope below his command tent, and a 26-year-old daimyō named Oda Nobunaga had become a name people in Kyoto would have to learn. That is what a decisive battle looks like when it is working at peak compression.
I have spent the last two years walking the surviving battlefields of late-medieval and early-modern Japan, and I think nine of them stand out as the ones that actually changed the country. Some of these you have heard of (Sekigahara, Okehazama, Nagashino). A few of them you probably have not (Yamazaki, Komaki-Nagakute).
One of them, Kawanakajima, is on this list precisely because it did not decide anything. I will explain why I included it. I will also tell you which three are worth visiting if you only have a week.
In This Article
- What I mean by “decisive”
- Battle of Okehazama (1560)
- Battles of Kawanakajima (1553-1564)
- Battle of Anegawa (1570)
- Battle of Mikatagahara (1573)
- Battle of Nagashino (1575)
- Battle of Yamazaki (1582)
- Battle of Shizugatake (1583)
- Komaki-Nagakute Campaign (1584)
- Battle of Sekigahara (1600)
- Threads that run through these nine
- Where to walk these battlefields today
- If you only have time for three: my contrarian pick
- The pattern these nine battles draw
What I mean by “decisive”
I am using “decisive” in a strict sense. A decisive battle is one that, by the time the smoke cleared, transferred power between dynasties, ended a clan, opened a strategic corridor that had been closed, or made a unification possible that had been impossible the previous morning. By that test, most of the battles of the Sengoku era do not qualify.
They were attritional. They wore opponents down without resolving the war. The nine I have picked are different. Each one of them ended a question that had been keeping people up at night.
I have also done one thing the textbooks usually do not, which is include Kawanakajima. Kawanakajima was five separate engagements over twelve years between Takeda Shingen and Uesugi Kenshin, and at the end of those twelve years the boundary between Kai and Echigo had moved by approximately zero kilometres. By my own definition that should disqualify it.
But I think the absence of a decision is the decision in this case. Two of the strongest commanders in Japanese history neutralised each other for over a decade, which left the central plain open for Nobunaga to do what he did. The non-decision at Kawanakajima made the decision at Okehazama possible.
The chronological order below is the right way to read this list. Each battle leans on the one before it. Skip to the section you want, but the threading is part of the point.
One quick note on the dates and the calendar. All the dates I give here are converted to the Gregorian calendar to make them legible to a modern reader. The Japanese chronicles use the lunar calendar of the period, so when a Japanese historian says Sekigahara happened on the 15th day of the 9th month of the 5th year of Keichō, that converts to 21 October 1600 in our reckoning.
I have done the conversion arithmetic where it matters for understanding what season a battle was fought in, because the season matters. Okehazama in May means thunderstorms. Mikatagahara in late January means snow on the ridge. Sekigahara in October means morning fog in the valley.
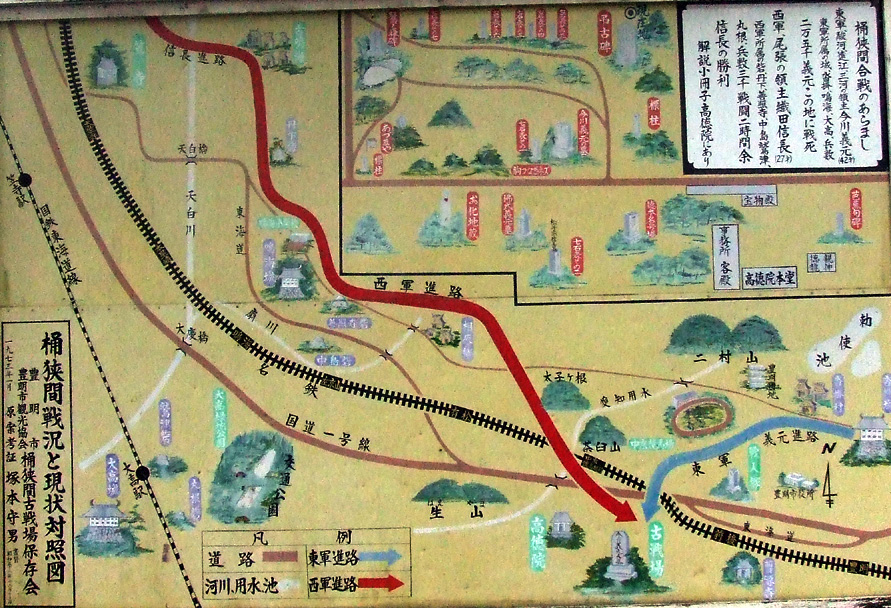
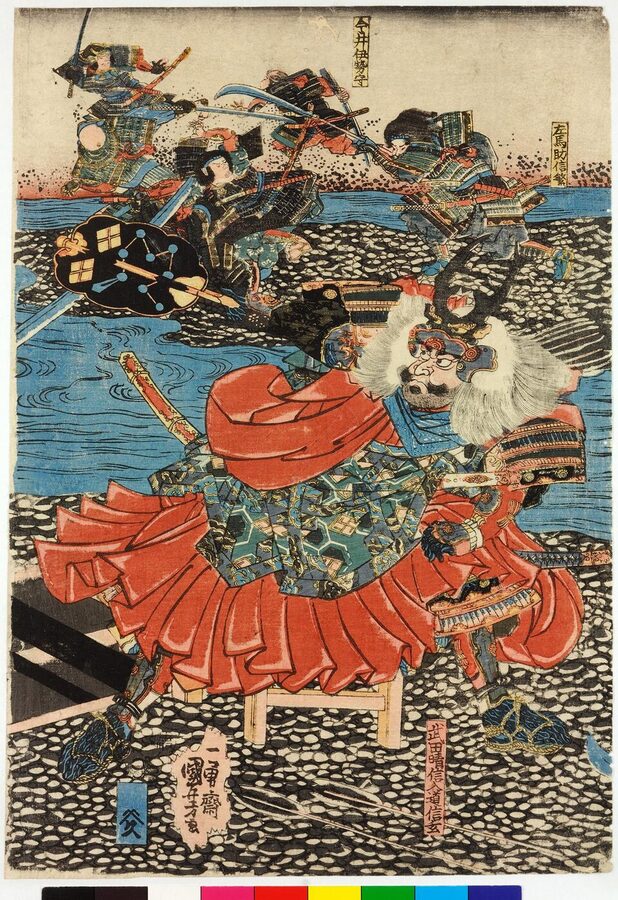
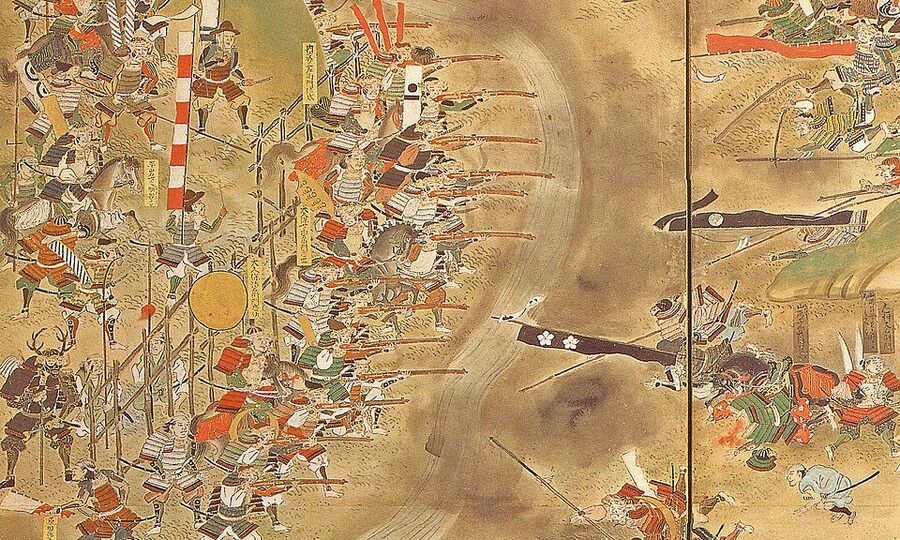
Battle of Okehazama (1560)
The force ratio for Okehazama is the headline number. Twenty-five thousand Imagawa against roughly two thousand Oda. The Imagawa were marching west on Kyoto along the Tōkaidō, having absorbed the smaller eastern provinces and pushed into Owari. Oda Nobunaga had been daimyō of Owari for eight years and was 26 years old. By every conventional Sengoku metric he should have lost his province and his life that afternoon.
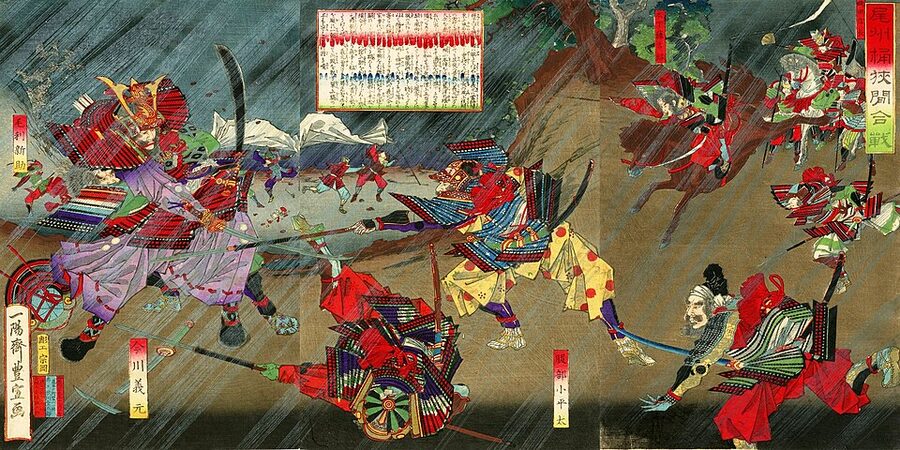
What Nobunaga had was geography and a forward scout system. Yoshimoto’s main column had stopped at Dengakuhazama, a wooded ravine, around midday. They were celebrating the easy capture of two Oda border forts that morning.
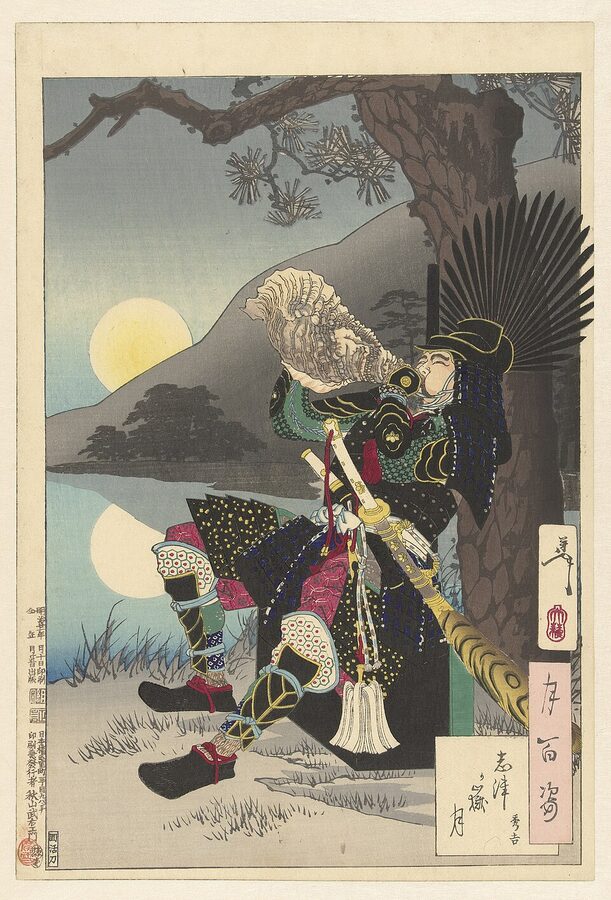
Their banners were stacked, the men were eating, and the rear half of the column was strung out for three kilometres along the road. Nobunaga’s scouts told him exactly where the command tent was. He left Kiyosu Castle at dawn with two thousand men, performed the famous Atsuta Shrine prayer along the way, and arrived above Dengakuhazama just as the storm broke.
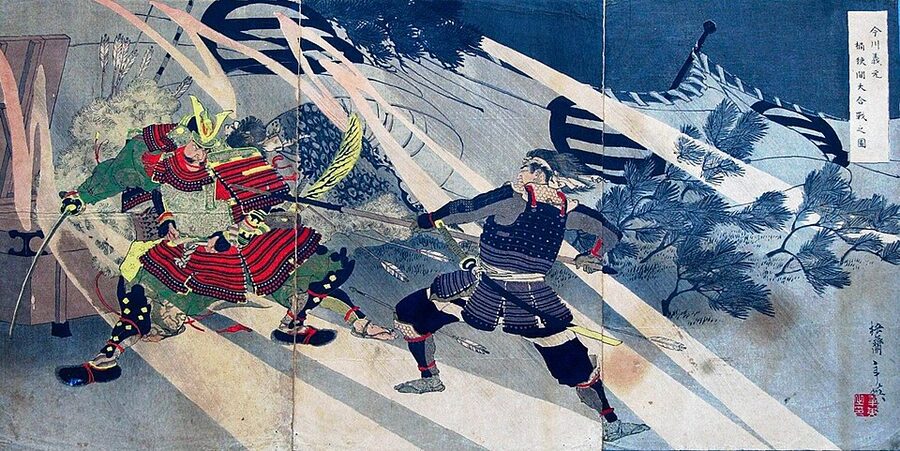
The attack itself took perhaps fifteen minutes. Yoshimoto, a court-trained Imagawa lord with blackened teeth, was cut down outside his tent by a samurai named Mōri Shinsuke. The Imagawa column did not just lose its commander.
It lost its strategic project. Within a year the Imagawa house had collapsed back into the eastern provinces, never to recover. Owari became the launching pad for everything Nobunaga would do over the next 22 years.
What I find the most interesting about Okehazama is that almost every individual decision Yoshimoto made was reasonable. He stopped his column for lunch in a defensible-looking valley after a victorious morning. He did not anticipate a 1:12 attack on his command position because no Sengoku commander would have anticipated that.
The asymmetry of the engagement was Nobunaga’s invention, and once you see Nobunaga inventing it, it stops looking like luck. He did this kind of thing repeatedly across his career.
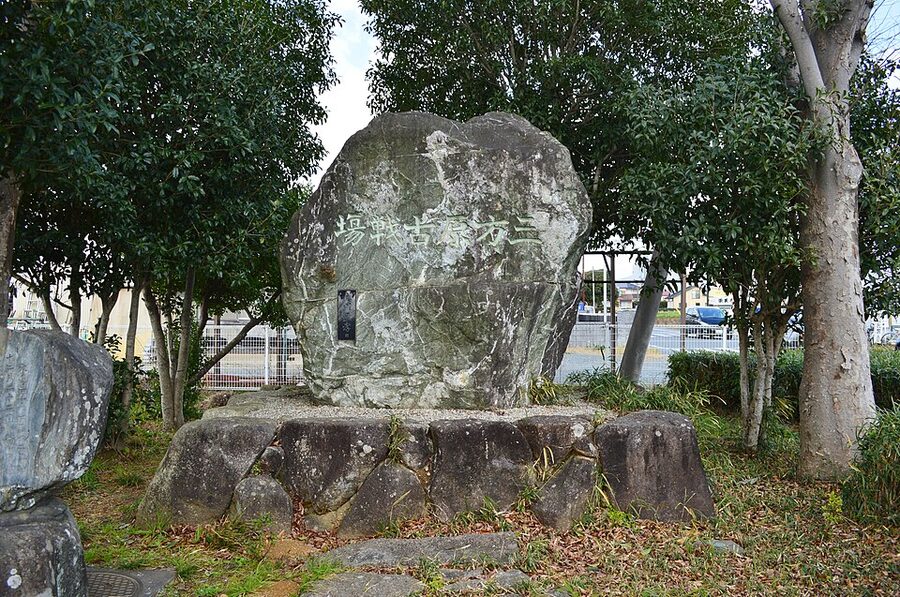
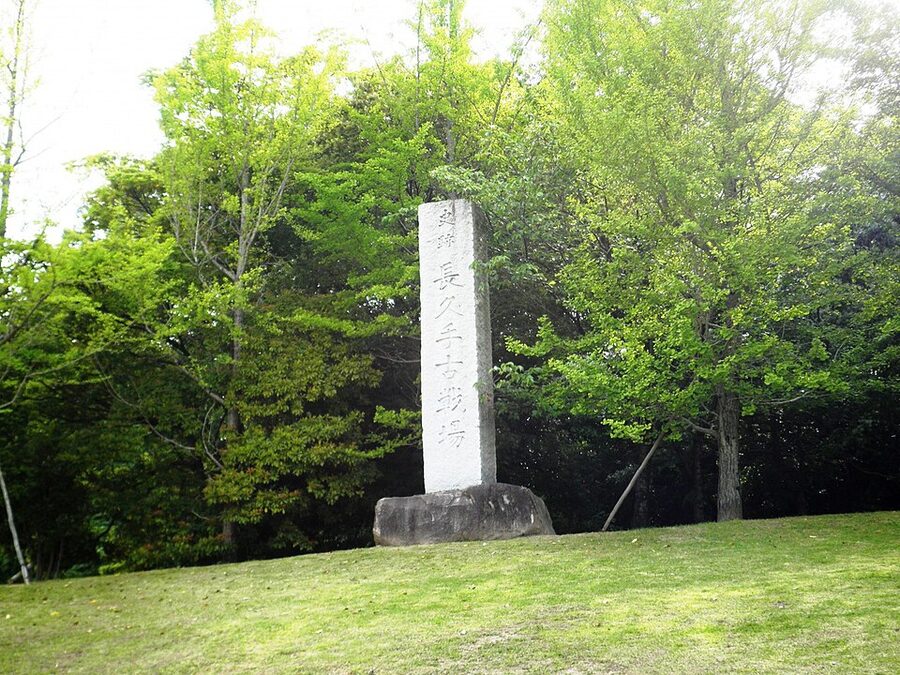
Battles of Kawanakajima (1553-1564)
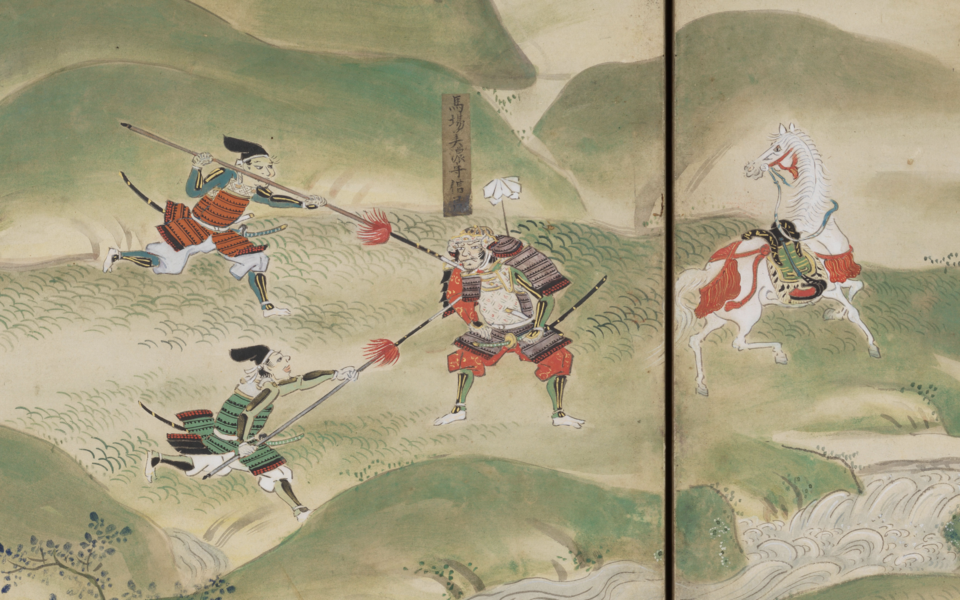
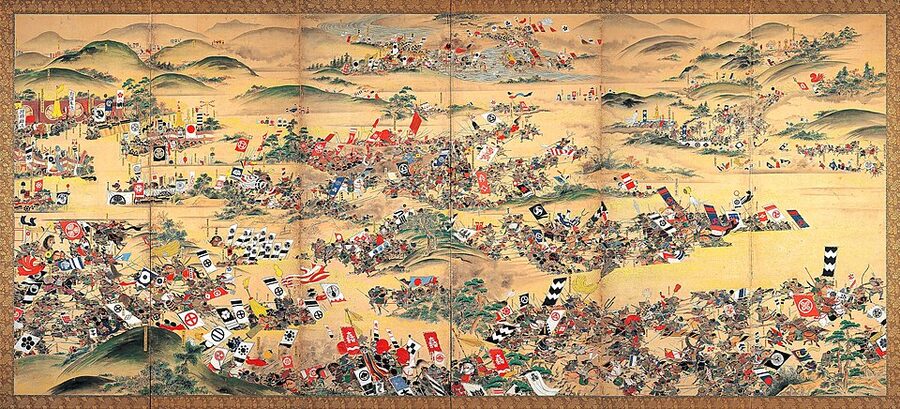
This is the entry that breaks the rule. Kawanakajima was not one battle but five separate engagements at the same place between Takeda Shingen and Uesugi Kenshin over twelve years. The fourth, in October 1561, was the bloodiest. Combined casualties on the Hachimanbara plain that morning came to roughly seven thousand men out of about thirty thousand engaged. By percentage of force destroyed it was one of the most costly engagements of the entire Sengoku period.
If you are wondering whether the famous war-fan duel actually happened, the honest answer is “probably not in the way the chronicles describe it, but something close to it likely did.” The Kōyō Gunkan story has Kenshin riding alone into the Takeda command tent and striking three times at the seated Shingen, who parried with his iron gunbai command fan. There is no contemporary record. The story enters the historical literature about a generation after the fact. But the fact that Kenshin made a deep penetration of the Takeda centre on 18 October 1561 is well-attested, and you do not get that without something dramatic happening at the command level.
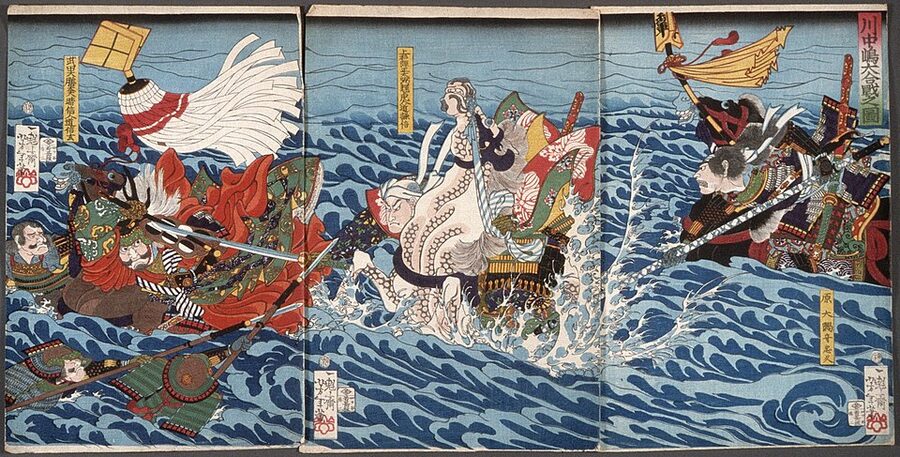
The reason I include Kawanakajima on a “decisive” list is the strategic vacuum it created. While Shingen and Kenshin were spending twelve years inflicting symmetric damage on each other in northern Shinano, Nobunaga was taking Owari, Mino, and the road to Kyoto. Neither of them could intervene because neither dared move first.
The two best Sengoku field commanders cancelled each other out, and the third-best commander walked through the gap. If Kawanakajima had ended in 1554 with one of them dominant, the rest of Japanese history is different.
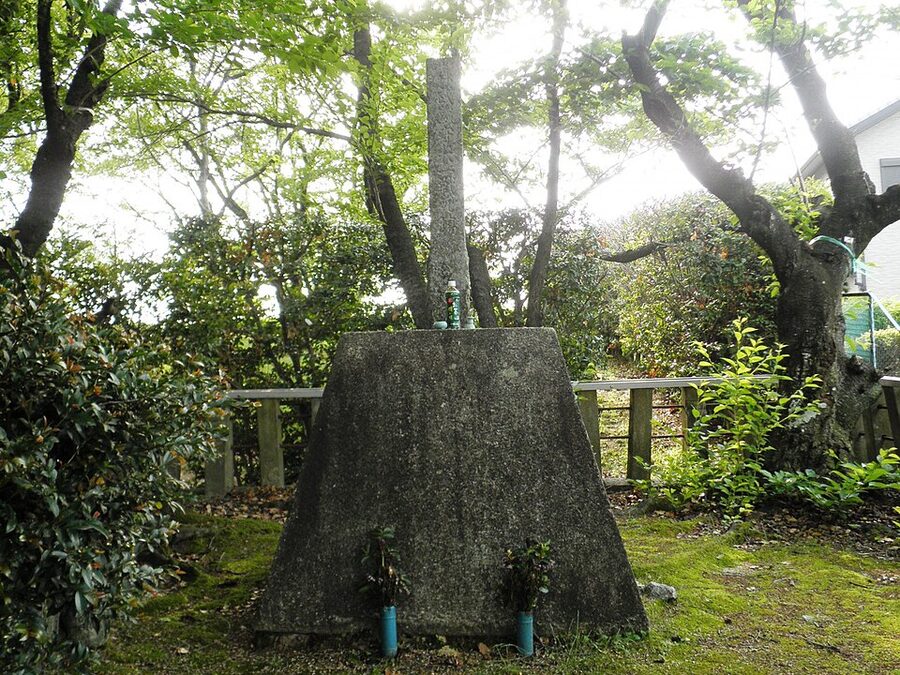
If you walk Hachimanbara today it does not feel like the deadliest field of a generation. It feels like a quiet park in Nagano with a small shrine and a bronze statue. The Chikuma River still loops the same way it did in 1561.
The Saijō-san position from which Shingen executed his “woodpecker” enveloping plan is still visible across the rice fields. You can stand at the centre of the park, where the duel is supposed to have happened, and see the entire battlefield in one sweep of the eye. It is one of the most legible Sengoku battlefields in Japan.
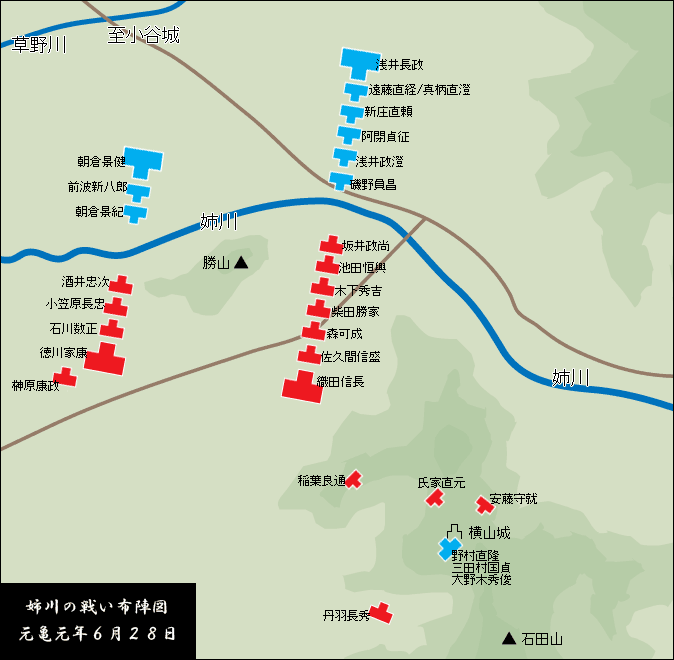
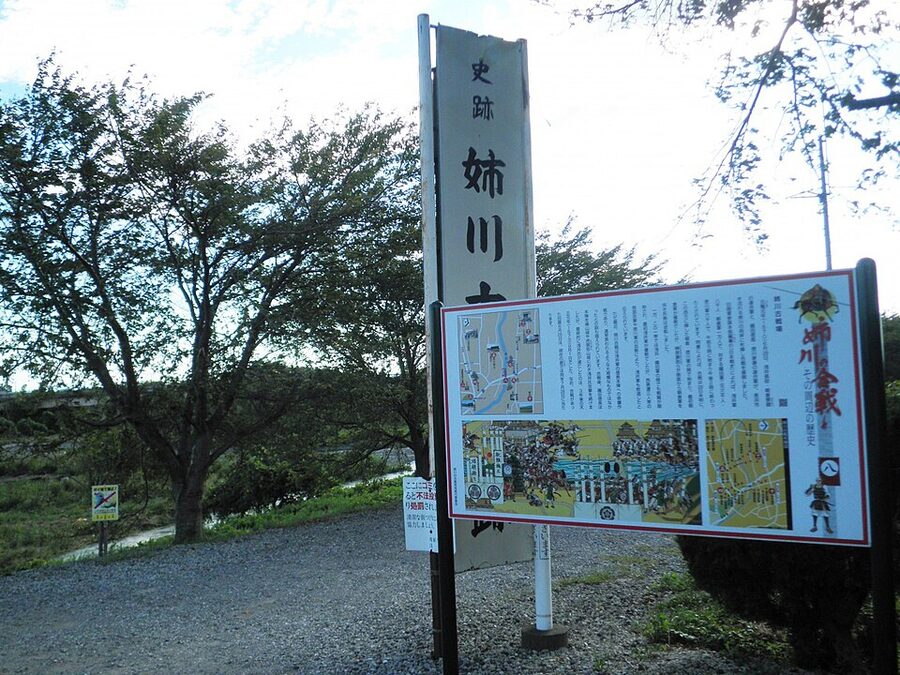
Battle of Anegawa (1570)
By 1570 Nobunaga had taken Mino, installed himself at Gifu Castle, married his sister Oichi to Azai Nagamasa, and marched on Kyoto with the puppet shōgun Ashikaga Yoshiaki in tow. The Azai betrayal that summer (Nagamasa siding with the Asakura against Nobunaga, despite the marriage alliance) almost ended the project. The Battle of Anegawa on 30 July 1570 is what kept it alive.
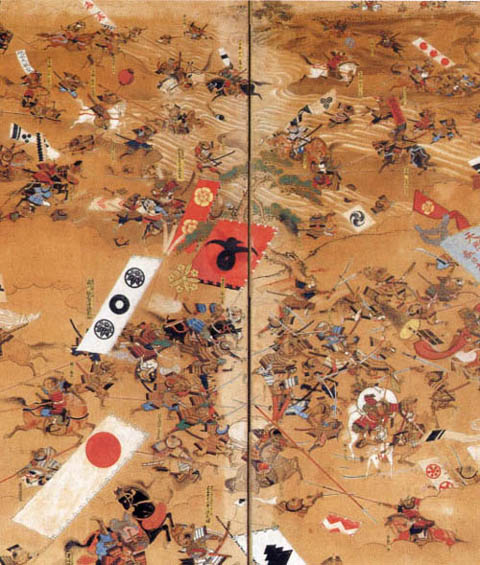
The matchup is what makes Anegawa interesting. Nobunaga had brought roughly 23,000 Oda men. Tokugawa Ieyasu, his ally, contributed 5,000 more. Across the river were 8,000 Azai under Nagamasa and 10,000 Asakura under Yoshikage’s nephew.
The Oda faced the smaller, harder Azai. The Tokugawa, smaller force, faced the larger but slower Asakura. That asymmetry was the engineering decision. Nobunaga gave the harder fight to himself and let Ieyasu work the easier flank, and the Tokugawa broke through first.
The single most-told story from Anegawa is Honda Tadakatsu riding out alone to delay the Asakura advance. Tadakatsu was 22 years old and a Tokugawa retainer. When the Asakura line was gathering momentum to overrun the Tokugawa right, Tadakatsu rode forward with his deer-antler helmet and his cross-shaped Tonbokiri spear, by himself, into the gap.
The Asakura paused to figure out what they were looking at. That pause was enough for the Tokugawa to consolidate. The single-rider gambit at Anegawa is what launched the career of the man who would become the most-decorated of the Tokugawa Shitennō.
Anegawa did not end the Azai or the Asakura. They survived as reduced powers for another three years. But the threat of an Azai-Asakura alliance overrunning the Oda-Tokugawa axis was finished that morning.
Nobunaga went on to crush both clans separately by 1573, with no further coordinated resistance possible. The Honda family kept the Anegawa hour as the founding moment of its public identity for the next 250 years.
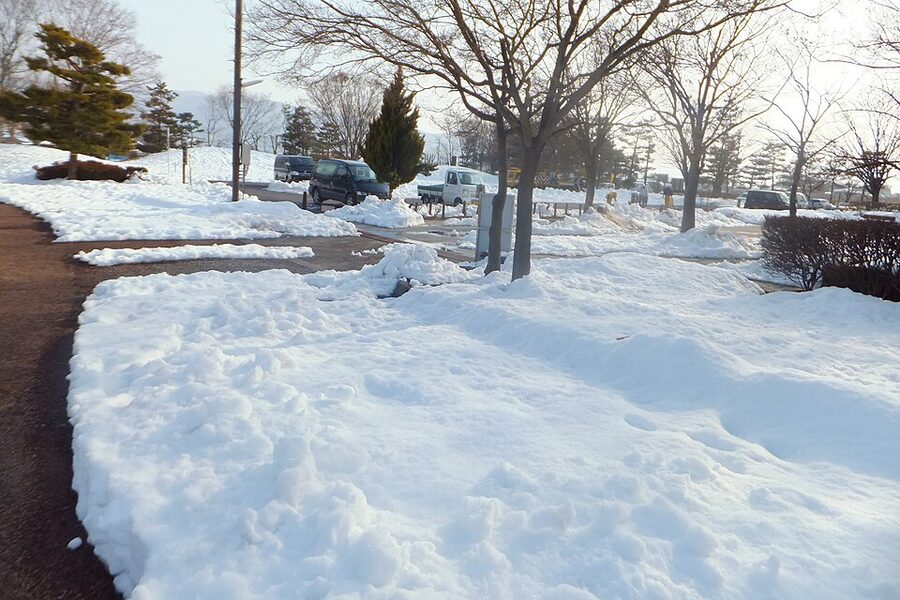
Battle of Mikatagahara (1573)
Mikatagahara is on this list because it was the moment Tokugawa Ieyasu was beaten almost to death and reorganised his entire approach to command. Shingen, finally satisfied that Kenshin was no longer a near-term threat, marched south in the winter of 1572-73 with 25,000 Takeda men. He aimed to cut Nobunaga’s lines and force a settlement. The only thing in his way was Ieyasu at Hamamatsu Castle with 11,000 men.

Every advisor told Ieyasu to stay inside the castle. Shingen was twice his strength, was the most experienced field commander of the period, and was just passing through. Ieyasu rode out anyway.
The honour code of the Tokugawa retainership at that point still held that you could not let an enemy column transit your territory unchallenged. Ieyasu’s force met Shingen’s on the open Mikatagahara plateau in the early afternoon of 25 January 1573. It was the wrong terrain for the smaller side. Open ground is where cavalry numbers tell.
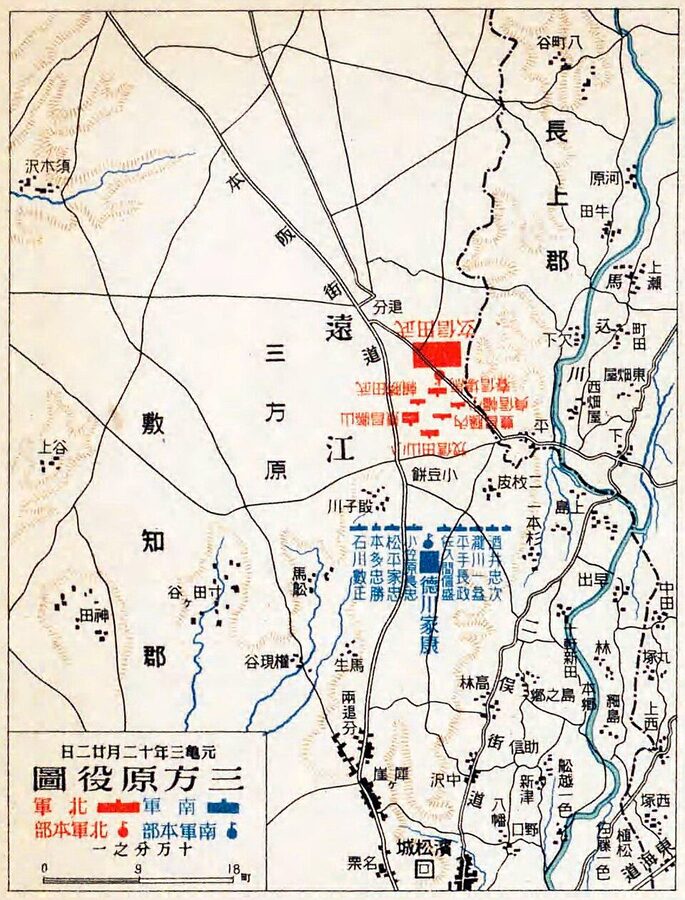
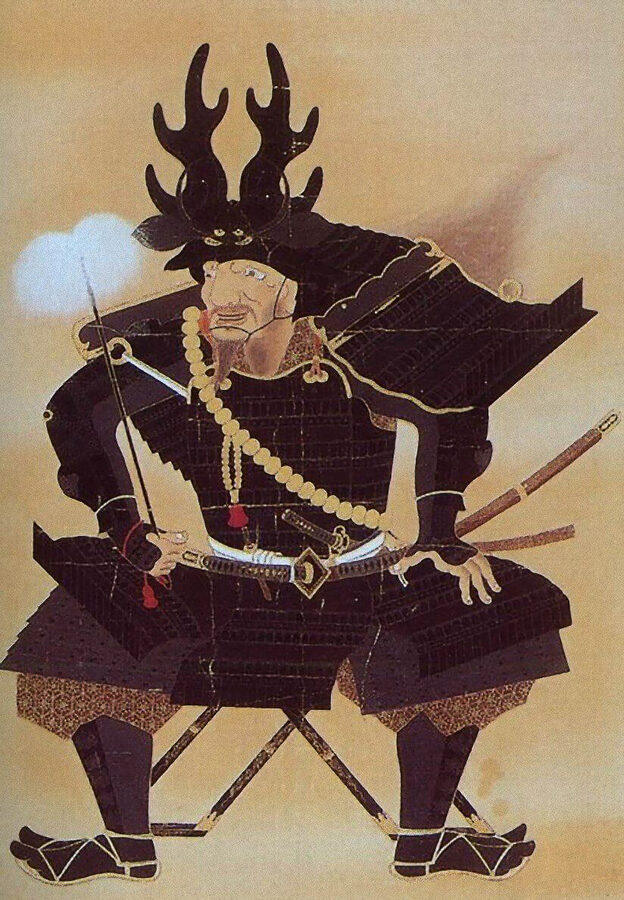
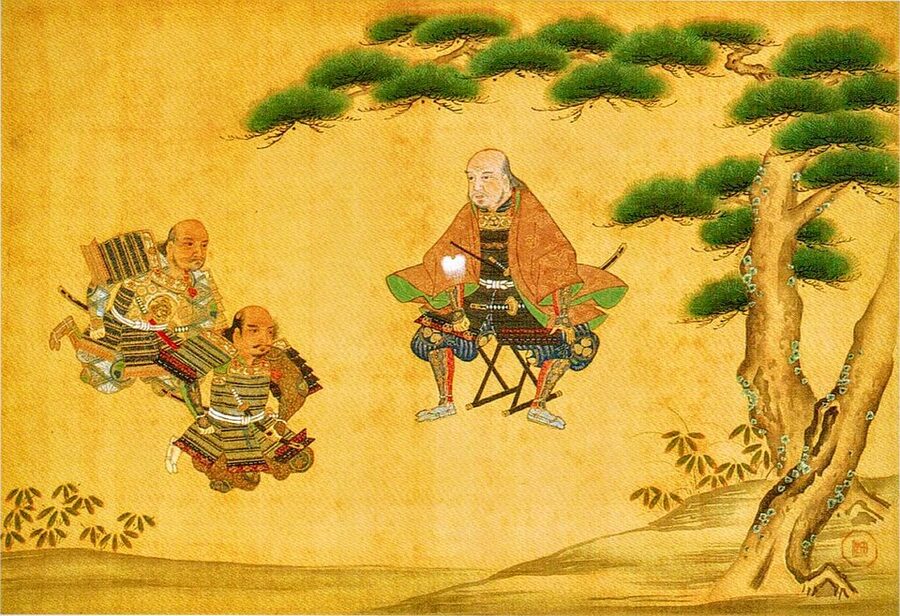
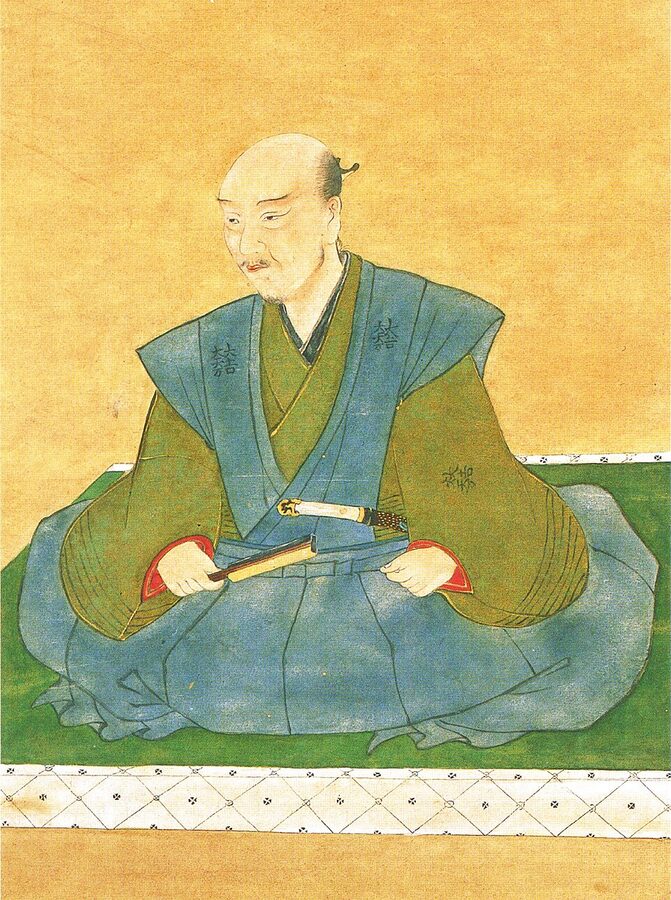
What happened next is the source of the famous portrait above. Ieyasu’s centre held for about ninety minutes before the Takeda right hooked around the Tokugawa left and rolled the line. Ieyasu lost roughly 1,200 men killed and another thousand wounded.
He himself rode back to Hamamatsu Castle so badly shaken that one of his retainers, Natsume Yoshinobu, deliberately impersonated him in the rearguard so that the Takeda pursuit would chase the wrong man. Yoshinobu died in Ieyasu’s place. Ieyasu reached the castle, ordered the gates left open and the braziers lit, and slumped into a chair. The portrait was commissioned in that moment.
The Takeda did not press the assault on Hamamatsu Castle. Shingen was already coughing blood from the lung condition that would kill him three months later. He pulled the column back into Mikawa, then withdrew altogether to Kai, and died on the road home.
His son Katsuyori inherited a campaign Ieyasu had not actually won and a clan whose strategic momentum had stopped at a Tokugawa defeat. The decisive moment of Mikatagahara was the year that followed it. Ieyasu would never again let honour drag him into a fight on terrain that suited the other side.
Battle of Nagashino (1575)
Nagashino is the battle that ended the Takeda. By the spring of 1575, Katsuyori had inherited his father’s army but not the strategic patience that came with it. He invested Nagashino Castle on the Tokugawa-Takeda border, intending to draw Ieyasu and Nobunaga into open battle.
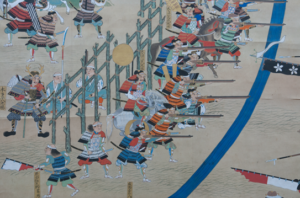
They came. They came with 38,000 men, three thousand of which were matchlock ashigaru behind a triple wooden palisade across the only viable approach.
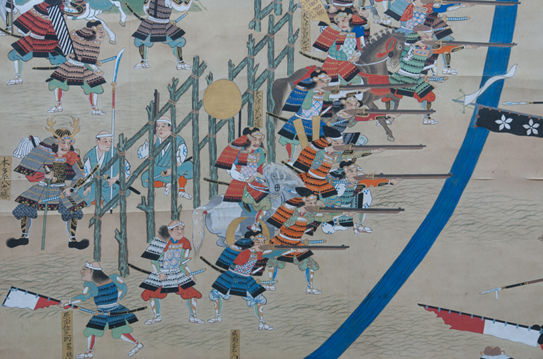
The Takeda mounted force had been the strategic asset of central Japan for thirty years. Cavalry shock was their core competence. At Nagashino on 28 June 1575, Katsuyori ordered that asset to charge across about 200 metres of open ground, in the rain, into matchlock fire. He did this for eight hours.
By the end of the afternoon, two of Shingen’s three surviving senior commanders, Yamagata Masakage and Baba Nobuharu, were dead. Anywhere between 8,000 and 10,000 Takeda men had been killed. The cavalry was simply gone.
I want to be precise about Nagashino’s significance, because the textbook story (Nobunaga invents volley fire, ends cavalry warfare in Japan) is half-right at best. The volley fire was not a Nobunaga invention. The matchlock had been on Japanese battlefields for over thirty years.
What Nobunaga did was decide the engagement on the ground he chose, with the carpentry he wanted, against an opponent who had to attack on his timeline. The tactical innovation was operational, not technical. He made Katsuyori fight the battle Nobunaga wanted to fight.
The Takeda survived as a shrinking territorial power for another seven years before Katsuyori was finally cornered into seppuku at Mt. Tenmoku in 1582. But by Nagashino + 1 they were no longer a strategic factor in central Japan.
The Tokugawa border was secure. The northern road to the capital was open. Nobunaga could turn his attention to the west, which is where he was when his luck ran out at Honnō-ji seven years later.
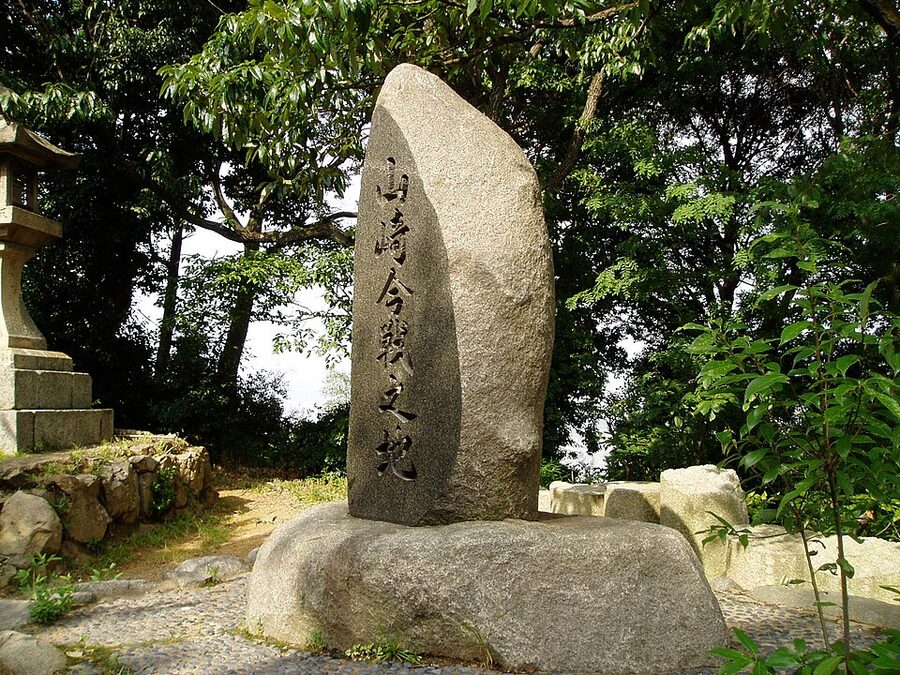
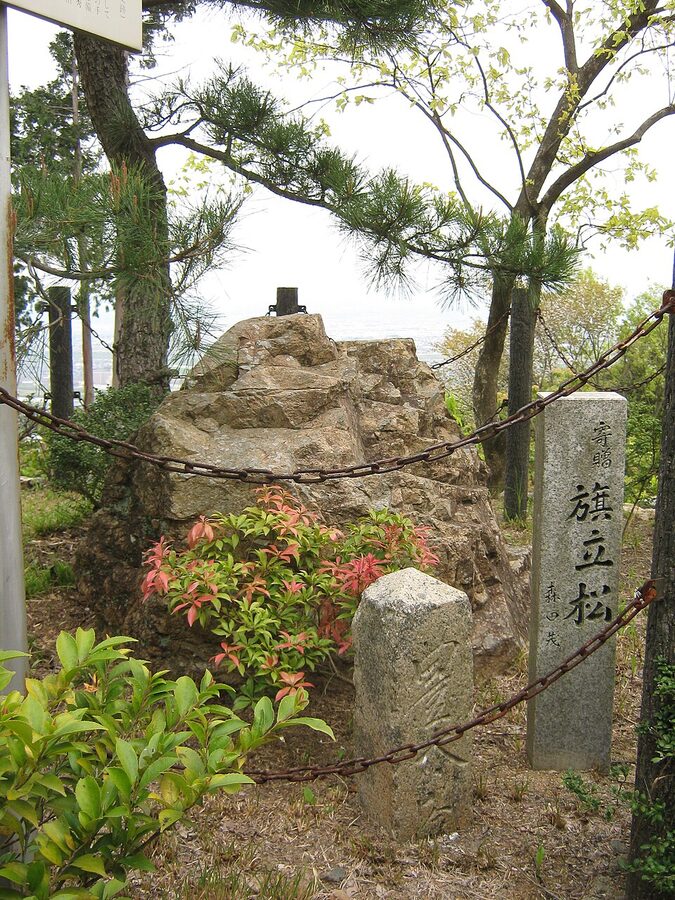
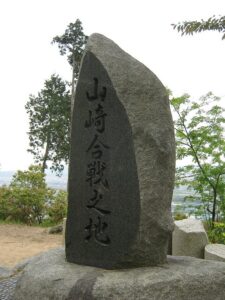
Battle of Yamazaki (1582)
Nobunaga was burned alive at Honnō-ji on 21 June 1582 in a coup engineered by his most senior general, Akechi Mitsuhide. Mitsuhide held Kyoto for eleven days. By day twelve he was dead in a bamboo grove.
The intervening eleven days are the speed-of-execution record of the Sengoku period and the founding moment of Toyotomi Hideyoshi’s career. The Battle of Yamazaki on 2 July 1582 is what closed it.
When Nobunaga died, Hideyoshi was 230 kilometres west of Kyoto, besieging Takamatsu Castle. He learned of the assassination on 23 June. He had a peace agreement signed at Takamatsu within 36 hours, broke camp, and force-marched 230 kilometres east in five days through summer heat and rain.
The Hashiba column moved in three echelons with mounted couriers running a 50-kilometre relay system. By 1 July Hideyoshi’s vanguard was at Yamazaki, on the strategic narrow corridor between Tennō-zan and the Yodo River. The whole project was three weeks old. Most armies could not have moved that fast on a clear road, never mind through the chaos of a regicide.
Mitsuhide had about 16,000 men. Hideyoshi had been able to assemble roughly 30,000 in the days he had. The Akechi line ran along the Enmyōji River with mounted units in reserve.
Hideyoshi pushed his front through the narrow ground between the river and Tennō-zan, with the right wing under Maeda Toshiie and Ikeda Tsuneoki working over the slopes. The frontal pressure pinned the Akechi centre while the right hook found the Akechi flank. The fighting collapsed in about two hours.
Mitsuhide fled toward his fortress at Sakamoto. He never made it. He was killed by farmers in a bamboo grove at Ogurusu, run through with a bamboo spear, on the road home.
His head was delivered to Hideyoshi the following morning. The eleven-day shōgun, the man who had killed Japan’s most powerful warlord and held the imperial capital, ended his life in a field of vegetables. Hideyoshi inherited the Oda alliance system, the western armies, and the political claim to be Nobunaga’s avenger. By autumn he was rapidly becoming the second man in Japanese history to look credible as a unifier.
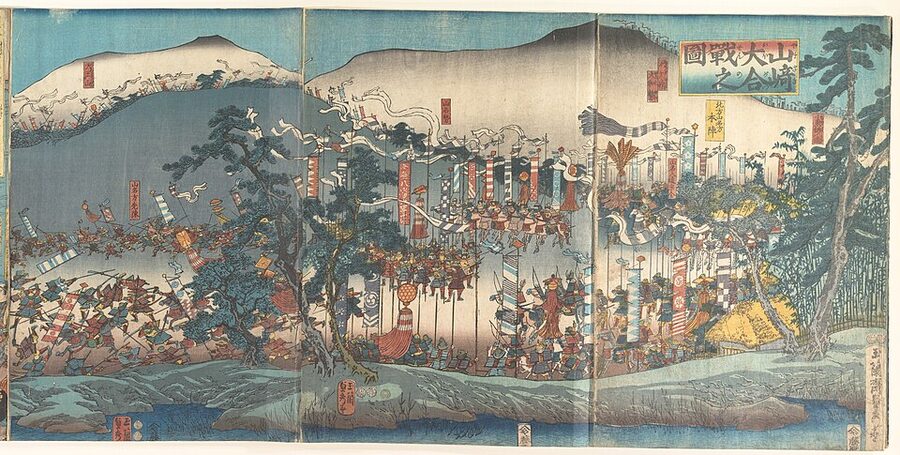
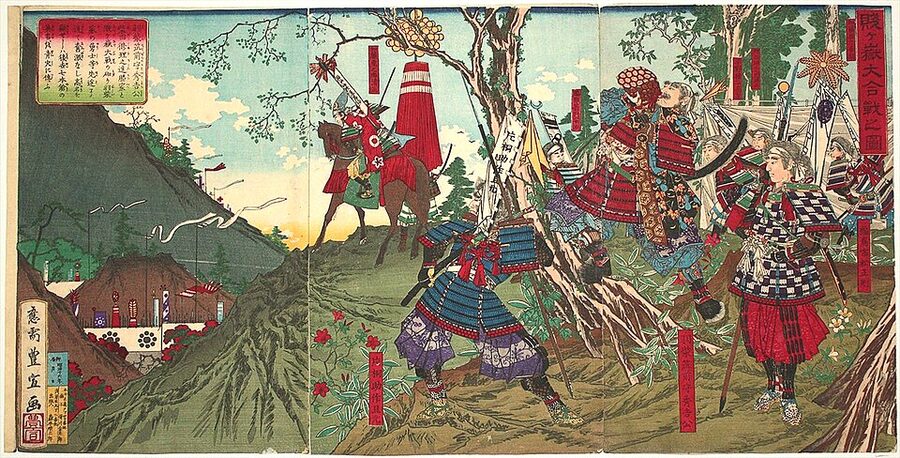
Battle of Shizugatake (1583)
One year after Yamazaki, Hideyoshi had to fight the same battle again with a different opponent. Shibata Katsuie was the senior Oda general Hideyoshi had not been able to absorb politically. Shizugatake on 21 June 1583 was the engagement that determined which of the two would inherit the Oda succession. Like Yamazaki, the answer came from a forced march that opponents did not believe was possible.
The set-up was a ridge campaign in northern Ōmi. Shibata’s army of 30,000 was deployed across a chain of hills on the north side of Lake Yogo. Hideyoshi had 50,000 strung out across a wider perimeter.
Sakuma Morimasa, Shibata’s nephew, broke discipline by attacking Hideyoshi’s forward fort at Ōiwayama on 19 June. He killed the commander. Hideyoshi was 52 kilometres south at Ōgaki when the news reached him.
He turned the entire Hashiba army around and forced it back at a pace of 12 kilometres an hour through the night, a march known in Japanese popular history as the Mino-no-Ōgaeshi. By dawn on 21 June he was back in front of Sakuma’s overextended position with fresh reserves.
What followed is the most famous individual-combat episode of the campaign and the founding myth of the Toyotomi system. Seven young Hashiba retainers (Katō Kiyomasa, Fukushima Masanori, Wakizaka Yasuharu, Hirano Nagayasu, Katō Yoshiakira, Kasuya Takenori, and Hira Mitsuyori) led the spearhead assault on Sakuma’s broken position. They became the Shizugatake no Shichi-hon-yari, the Seven Spears of Shizugatake.
Each of them would receive his own fief from Hideyoshi, and each would in turn play a major role at Sekigahara seventeen years later. Five of the seven would defect to Ieyasu’s side that day.

Sakuma’s force broke before noon. Maeda Toshiie, who had been holding the Shibata centre, withdrew without a fight. That single decision (Maeda walking away rather than committing to a senior comrade) was the political collapse of the Shibata cause.
Katsuie retreated to Kitanoshō Castle, where he died with his wife Oichi (Nobunaga’s sister, the same Oichi who had been married to Azai Nagamasa thirteen years earlier) in a fire he set himself. Their daughters, the Three Beauties of Asai, would become Hideyoshi’s wards. The eldest, Yodo-dono, would bear his only son.
Komaki-Nagakute Campaign (1584)
This is the entry that does not look decisive at first glance. Komaki-Nagakute ended in a negotiated draw. Hideyoshi had 100,000 men. Ieyasu had 35,000.
They glared at each other for seven months across a series of forts north of Nagoya, fought one sharp engagement at Nagakute on 18 May 1584, and signed a settlement in November under which Ieyasu sent his second son to Hideyoshi as a hostage and Hideyoshi acknowledged Ieyasu as a peer. Neither side achieved its strategic objective. So why is it on this list?
It is on this list because it is the campaign in which Hideyoshi failed to absorb Tokugawa Ieyasu, and that failure shaped the next sixteen years. At Nagakute on 18 May, Ieyasu intercepted an Ikeda Tsuneoki raiding column that Hideyoshi had detached from the main force. The Ikeda detachment was 16,000 men. Ieyasu hit them with 9,000 from an oblique angle in the early morning.
Tsuneoki was killed. His son Motosuke was killed. Mori Nagayoshi, Tsuneoki’s son-in-law and one of the most aggressive young Toyotomi commanders, was killed. Hideyoshi lost 2,500 men in three hours.
Hideyoshi was the better strategic chess player and he knew it. After Nagakute he stopped trying to crush Ieyasu and pivoted to political pressure instead. The 1584 settlement was Hideyoshi acknowledging that Ieyasu was the only one of the major Sengoku heirs he could not simply outmuscle.
He would have to be co-opted. The terms (a hostage from Ieyasu, a sister of Hideyoshi’s married into the Tokugawa, a junior court rank for Ieyasu) were the fundamental architecture of the next sixteen years. Ieyasu remained as a senior peer of the Toyotomi system, with his own retainership and his own provinces, and when Hideyoshi died in 1598 that retainership was still intact.
Komaki-Nagakute is decisive in the negative sense. It is the battle that did not end the Tokugawa, when by every conventional measure Hideyoshi should have been able to do exactly that. The fact that Ieyasu survived 1584 with his retainership intact is the precondition for everything that happened in 1600. You cannot understand Sekigahara without understanding why Ieyasu still had an army to bring to it.
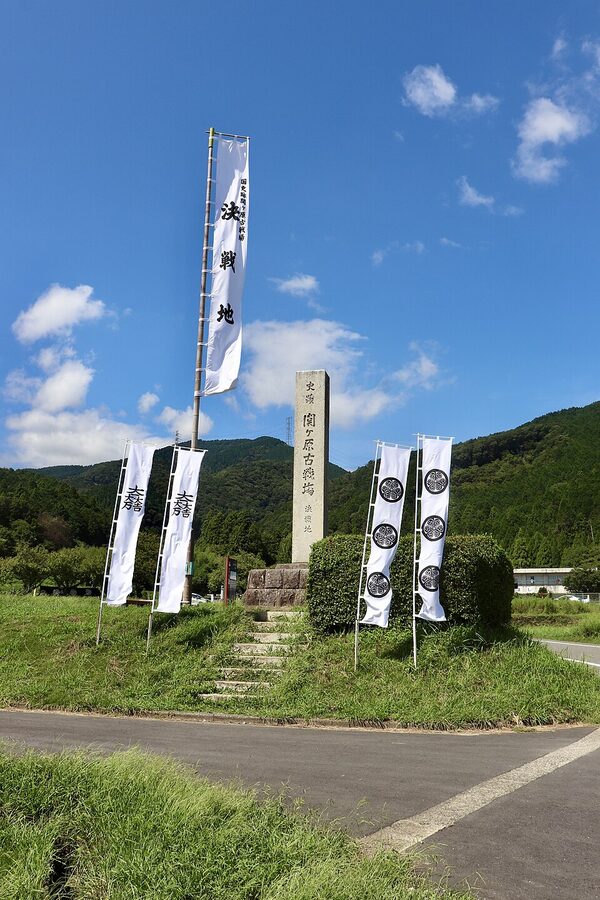
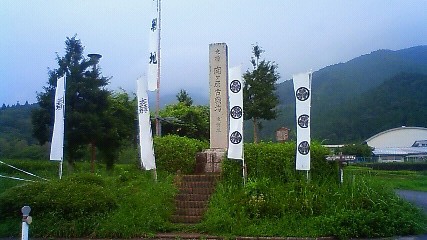
Battle of Sekigahara (1600)
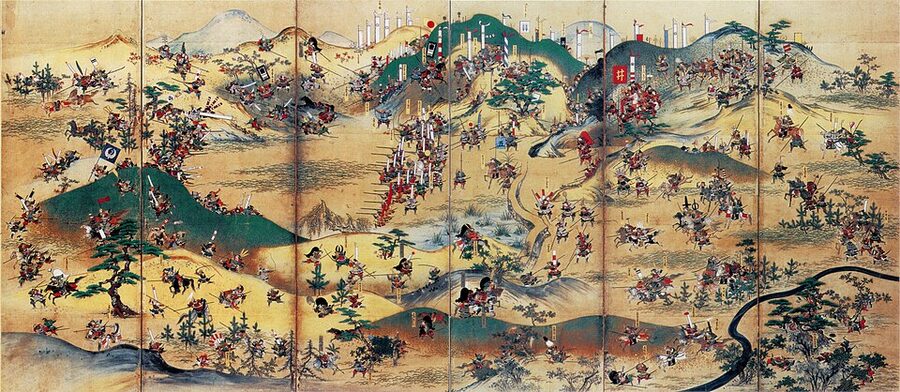
The most consequential battle in Japanese history was decided before lunch. Sekigahara began at about 8 a.m. on 21 October 1600 in heavy fog. By 2 p.m. it was over.
Roughly 160,000 men had been on the field. Approximately 30,000 of them were dead. The single decision that ended the engagement was a defection executed at noon by a 19-year-old named Kobayakawa Hideaki, who was supposed to be holding the Western Army’s right flank from a hill named Matsuo-yama and instead came down off the hill into the side of his own coalition.
The political background mattered. Hideyoshi died in August 1598 with a five-year-old heir, Hideyori, and a council of five regents to govern until the boy came of age. Within two years the council had collapsed into two factions. Ishida Mitsunari, the Toyotomi-loyalist administrator, organised the Western Army around Hideyori’s claim.
Tokugawa Ieyasu, the senior regent, became the focal point of the Eastern Army’s argument that Mitsunari was the actual usurper. The two armies converged on a 4-kilometre saddle in western Mino called Sekigahara because it was the only ground in the area on which an engagement of that scale could be fought.
If you read only the deployment maps, Mitsunari should have won. The Western Army actually had the better terrain. The Western units on Sasao-yama, Tenmanyama, and Matsuo-yama had Ieyasu’s columns in a partial encirclement before the first arquebus fired.
The problem was that several of the Western commanders, including Kobayakawa, Kikkawa Hiroie, and Mōri Hidemoto, had already cut secret deals with Ieyasu before dawn. The Eastern Army knew which Western units would not actually engage. The whole battle ran on that asymmetric information.
The morning ran in stalemate. Mitsunari signalled Kobayakawa repeatedly to attack the Eastern flank. Nothing happened. At about 11:30, Ieyasu fired a single arquebus volley at Matsuo-yama.
The signal was unmistakable. Either Kobayakawa came down the hill into the Western Army, the way he had agreed in the pre-dawn deal, or Ieyasu would attack him next. Kobayakawa came down the hill.
He hit the loyal Western units of Ōtani Yoshitsugu in the right flank, Ōtani’s line collapsed, and within ninety minutes the entire Western order of battle was disintegrating. By 2 p.m. it was over. Mitsunari was caught fleeing two days later and beheaded in Kyoto.
Sekigahara is decisive in the strongest possible sense. The 268 years of Tokugawa peace that followed (the entire Edo period, the foundations of modern Japanese cities and infrastructure, the closing of the country, the slow social transformation that ended in 1868) are all downstream of what one teenage daimyō decided to do at noon on a foggy October day. Ii Naomasa took the first arquebus shot of the battle. Sanada Yukimura would not be at Sekigahara because his family had split, with his father and brother on opposite sides. Shimazu Yoshihiro would charge straight through the Tokugawa centre to escape, in one of the most legendary fighting retreats in Japanese history. Every name in the next century of Japanese politics was already on the field that morning.
Threads that run through these nine
If you read these chronologically you can see a few patterns the textbooks do not always isolate. The first is the force-ratio surprise. Okehazama at 1:12 and Anegawa with the asymmetric Tokugawa-Asakura matchup are both wins by the smaller side because the smaller side picked the engagement.
Nagashino is the same trick from the other direction, with Nobunaga forcing a numerically equal Takeda to attack the wrong terrain. None of these were lucky outcomes. They were engineered by commanders who understood that the formal numbers on paper do not determine the engagement.
The second thread is the Tokugawa Shitennō. Honda Tadakatsu, Sakai Tadatsugu, Sakakibara Yasumasa, and Ii Naomasa were the four senior Tokugawa generals who served Ieyasu from his teenage years to his old age. At least one of them is at almost every battle on this list.
Tadakatsu launched his career at Anegawa. Tadatsugu commanded Tokugawa centre at Nagashino and led the night flanking attack on Tobigasuyama. Naomasa fired the first shot at Sekigahara. The personal continuity of that retainership across forty years is the reason the Tokugawa house could absorb defeats like Mikatagahara without breaking apart.
The third thread is what is missing. The Korean expeditions of 1592 and 1597 are not on this list because, despite involving 150,000 Japanese troops and reshaping East Asian politics, they did not change the internal Japanese power structure. They drained the Toyotomi treasury.
They killed off Toyotomi field commanders and exposed the gap between Hideyoshi’s ageing leadership and the next generation. But there is no single battle in either campaign that you can point to as the inflection. The Korean wars are decisive in aggregate, not in any one engagement. So they sit outside this list.
And one event is not on this list because it was not technically a battle. The Honnō-ji Incident in June 1582, when Akechi Mitsuhide burned Nobunaga alive in a Kyoto temple, is arguably the single most consequential moment in late-medieval Japan. It killed off the unifier in his prime and threw the project to Hideyoshi by accident.
But it was an assassination, not a pitched engagement. The battle that resolved the Honnō-ji crisis was Yamazaki, eleven days later, and Yamazaki is on this list.
A fourth thread you can pull is the role of the matchlock. The arquebus reached Japan in 1543 by way of Portuguese traders shipwrecked on Tanegashima, and within a generation it was being made domestically at Sakai and Kunitomo in numbers no European army could match. By Nagashino in 1575 a Japanese commander could field three thousand of them at once.
By Sekigahara twenty-five years later, the gun had stopped being a tactical surprise and become a structural assumption of every Japanese order of battle. None of the nine engagements in this article involve the gun changing the question. They involve commanders building the gun into their tactical thinking and then making the right decisions about ground, weather, and timing.
A fifth thread is the role of the betrayal. At Okehazama, Yoshimoto’s flank security was sloppy because he expected loyalty he did not have. At Anegawa, Nagamasa’s betrayal of Nobunaga was the precondition of the whole engagement. At Sekigahara, Kobayakawa’s noon defection ended the battle.
The Sengoku period’s actual political grammar was the strategic alliance, and the strategic alliance ran on personal loyalty that could be bought, married, hostage-secured, or simply broken. Almost every battle on this list has someone in the order of battle who is about to switch sides. You read the engagements differently once you stop assuming that the army on either flag is acting as a single intent.
A sixth and final thread is the geography. Look at a map and seven of these nine battles cluster in a 200-kilometre arc from Owari and Mino through Ōmi to the Kyoto basin. That is not coincidence.
The early-modern unification of Japan ran along the central spine of the country, between the eastern Tōkaidō road and the western Sanyō road, with the Kinai capital region as the prize. The two outliers are Mikatagahara, which is the eastern Tōkaidō, and Kawanakajima, which is in the mountainous interior of Shinshū. Even those are about controlling access to the central plain. The country was being unified along a road, and these battles are the kilometre markers.
One last observation about the threads. Each of the three unifiers played a different role in this sequence. Nobunaga is the architect of the engagements, the one who picks his ground and forces opponents to fight on it. Hideyoshi is the operational marathoner, the one who wins because he can move armies further and faster than anyone else thought possible.
Ieyasu is the survivor and the consolidator, the one who learns from the loss at Mikatagahara and turns that learning into a 268-year political settlement. The Sengoku period needed all three temperaments in that order. If any of them had come earlier or later, the unification would have failed. The fact that they came in sequence, each picking up where the last one left off, is the central improbability of the whole story.
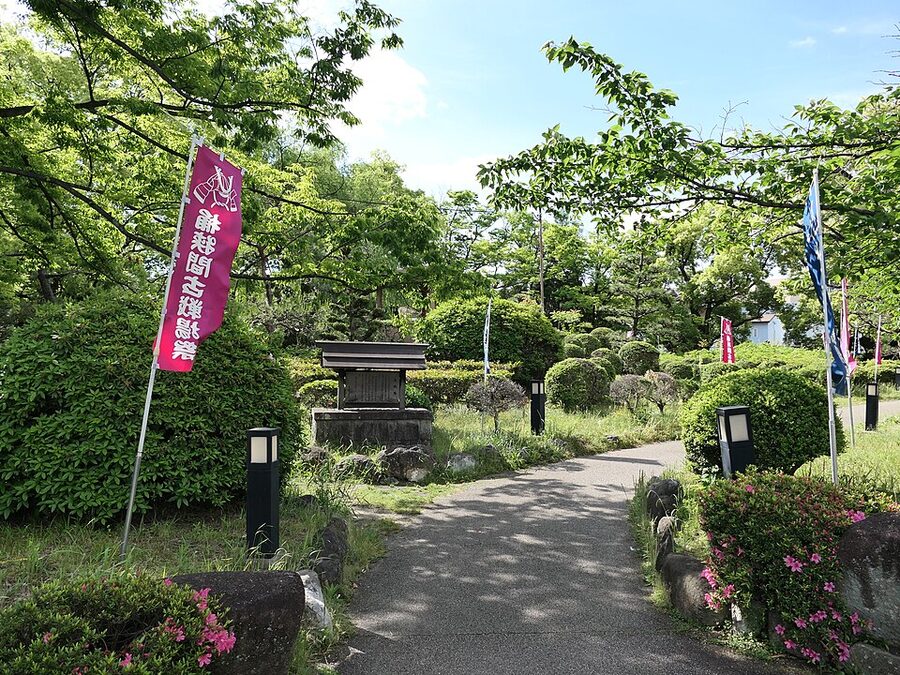
Where to walk these battlefields today
Most of these sites are still legible to walk. The Japanese tradition of preserving battlefield ground (often as small parks with stone markers, sometimes integrated into modern shrines, occasionally just left as rice paddy with a sign) means you can stand on the ground where things happened. I have done all nine of these in the last two years. They cluster geographically.
The Nagoya cluster gives you Okehazama, Anegawa (an hour east on the Tōkaidō line), and Komaki-Nagakute (40 minutes north of Nagoya by car). All three sit within about 90 minutes of central Nagoya, and you can chain them as a two-day campaign. The Komaki area also includes Inuyama Castle, one of the 12 original castles, which makes a good break from pure battlefield walking.
The Kyoto cluster gives you Yamazaki and Shizugatake. Yamazaki is 30 minutes by JR from Kyoto Station, on the Tōkaidō line, and Tennō-zan can be climbed in an afternoon from Ōyamazaki Station. Shizugatake is two hours northeast at Lake Yogo, but the train and ferry combination through Lake Biwa makes for a memorable approach. Bring walking shoes for Tennō-zan and a packed lunch for the Shizugatake summit.
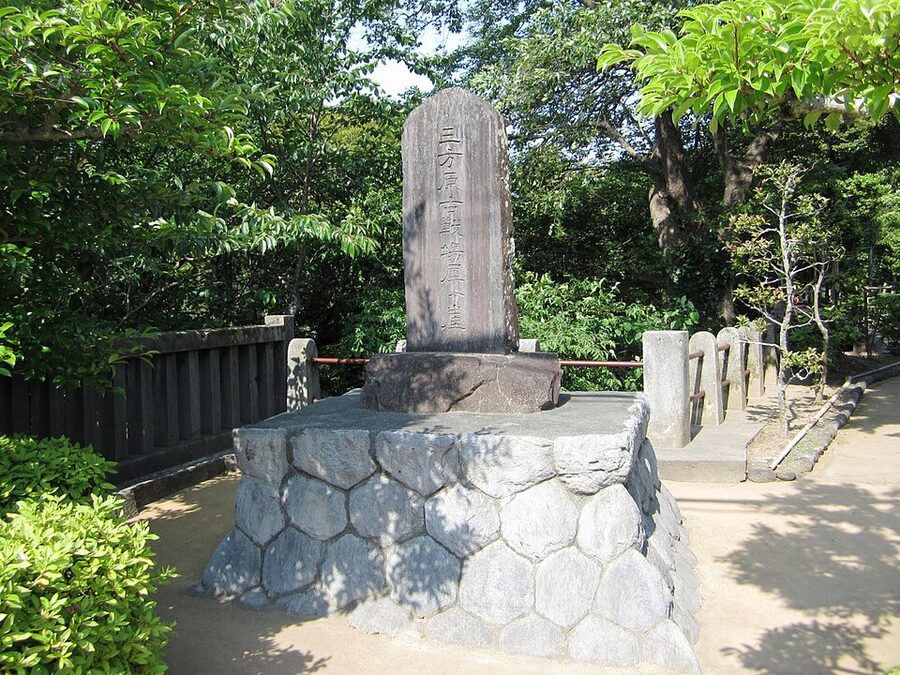
Mikatagahara is in modern Hamamatsu. The Sekihi monument and the Saigagake cliff-edge memorial are both in residential Hamamatsu, easily walkable from the Shinkansen station. Azuchi-period Hamamatsu Castle, where Ieyasu was based, is a ten-minute walk from the modern central station. You can do Mikatagahara in a single afternoon as a Tokyo day trip if you are quick.
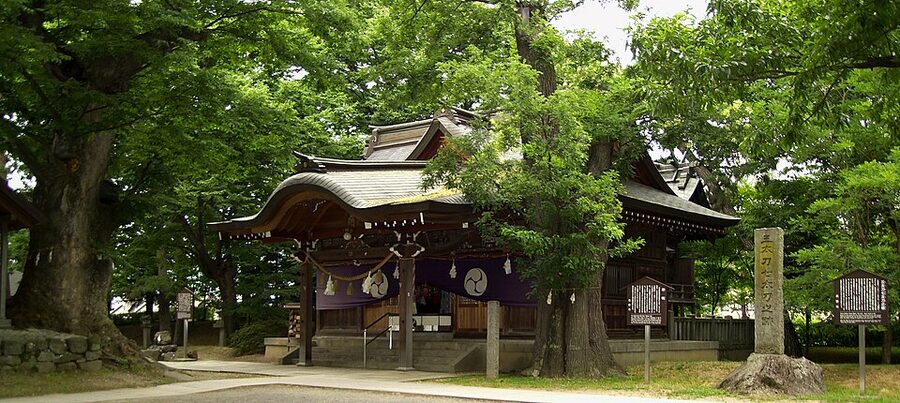
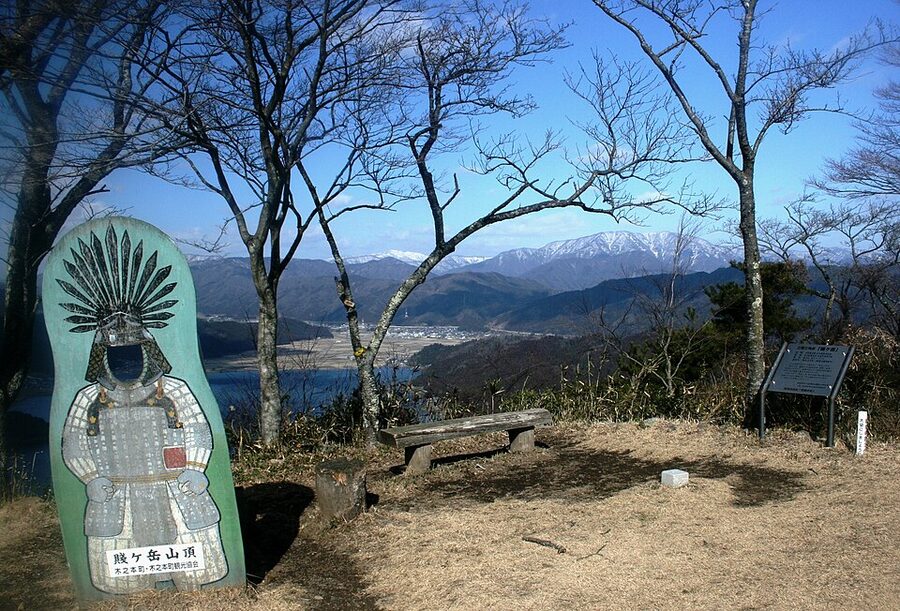
Kawanakajima is in Nagano City. Hachimanbara Historical Park is the centre of the site, with the duel statue, the Hachiman-sha shrine, and the Saijō-san viewpoint all walkable from the central park. The Matsushiro Castle area, where the Takeda based their north-Shinano operations, is 15 minutes south by bus. Nagaragawa-onsen is half an hour further if you want to bathe out the ache.
Nagashino is the most rural site on this list. Shinshiro City in eastern Aichi is 90 minutes from Toyohashi by JR Iida Line. The Nagashino Castle promontory and the Shitara-ga-hara battlefield are on opposite sides of the modern town, joined by a 4-kilometre walking trail through the historical interpretation centre.
The local museum has the actual triple-palisade reconstruction, full-size, and you can stand inside it. It is the most physically immersive of the nine sites.
Sekigahara is its own train stop on the Tōkaidō line, an hour east of Kyoto and 30 minutes west of Gifu. The whole battlefield is walkable in a single day, with a marker at every commander’s command post and a free museum at the site of Ishida Mitsunari’s headquarters on Sasao-yama. The town puts on an annual reenactment in October. If you can time a visit to that weekend, you will see a few thousand local volunteers in armor walking the engagement in real time.
If you only have time for three: my contrarian pick
The conventional answer to this question is Sekigahara, Nagashino, and Okehazama. They are the most famous, they have the best signage, and they all have nearby castles and museums to round out the day. If a friend asked me with a one-week itinerary in their hand, I would actually answer differently.
I would go to Mikatagahara, Yamazaki, and Kawanakajima. Hear me out. Mikatagahara is the better story than Okehazama because it is the loss that taught Ieyasu how to win, and the Shikami-zō at the Tokugawa Art Museum is the most psychologically interesting object on this entire list.
Standing at the Saigagake cliff knowing what happened on it gives you something the well-mannered Sekigahara grand monument does not. You feel the embarrassment.
Yamazaki is the tightest space-time-to-significance ratio of any battlefield in Japan. The whole engagement happened in a 3-kilometre corridor in eleven days. You can walk the entire decisive ground in two hours. The fact that the Japanese language preserves tennōzan as the idiom for any decisive moment, and that you can climb the actual Tennō-zan and stand at the actual Flag-Planting Pine, gives you a piece of living vocabulary you will never read the same way again.
Kawanakajima is the contrarian pick, because most travel guides skip it on the grounds that “nothing was decided.” That misses the point. The reason to walk Hachimanbara is that the absence of decision is itself the most legible thing on the ground. The two armies fought five times and the river still runs the same way.
The shrine is still the focus of the park. The duel statue is in the middle of all of it. You stand there and feel the weight of two enormous reputations cancelling each other out, and you understand why Nobunaga had the central plain to himself.
The orthodox three (Sekigahara, Nagashino, Okehazama) are the right answer for a textbook. Mikatagahara, Yamazaki, and Kawanakajima are the right answer for a trip you will remember.
I will add one practical caveat. Sekigahara is a worthy half-day if you happen to be travelling between Kyoto and Nagoya on the Tōkaidō line, and the museum at the central battlefield is small but excellent. The mistake is treating Sekigahara as a destination in its own right.
The town is sleepy, the signage is good but cold, and the stone monument with its offering box does not do the engagement justice unless you arrive already knowing what happened. The battlefield rewards prepared visitors. It does not introduce itself.
By contrast, Hachimanbara at Kawanakajima introduces itself immediately. You step into the park, the duel statue is right there, the shrine is small and atmospheric, the Saijō-san viewpoint is signposted, and the whole site can be absorbed in 90 minutes by someone with no prior reading. That accessibility is the reason I rank it higher than its strategic insignificance would suggest. The site does the historical work for you.
The pattern these nine battles draw
I started this piece with the 1:12 force ratio at Okehazama. I want to end with a different number. Between 19 May 1560 and 21 October 1600, a span of forty years and five months, the country went from fragmented into roughly fifty competing daimyō to unified under a single retired regent who would in two years become the first Tokugawa shōgun. That is a structural transformation on the order of the Bakumatsu in compressed time, and the architecture of it runs through these nine battles.
Each of them removed a coalition possibility. Okehazama removed the Imagawa. Anegawa removed the Azai-Asakura corridor. Mikatagahara removed Shingen as a near-term central-plain factor.
Nagashino removed the Takeda cavalry. Yamazaki removed Mitsuhide. Shizugatake removed Shibata.
Komaki-Nagakute should have removed the Tokugawa and did not, which is why Sekigahara had to happen. Kawanakajima neutralised two coalition possibilities at once for over a decade. Sekigahara closed the entire question.
You can read the next 268 years of Japanese history as the sustained execution of a settlement that had been negotiated, in blood, on these nine fields. If you stand on any one of them and you know what happened there, you are reading a chapter of that settlement directly off the ground. The trees have grown back.
The rice paddies have been ploughed. The same rivers run the same channels. But the country is still the country these nine engagements made.
I want to flag one more pattern before I close this. Five of these nine battles were fought within an 80-kilometre radius of the city of Nagoya. Okehazama, Anegawa, Nagashino, Komaki-Nagakute, and Sekigahara are all within a single day’s bus ride of Nagoya station. That cluster is not a coincidence either.
The Mino-Owari plain was the geographic centre of gravity of late-medieval Japanese politics, with Kyoto immediately to the west, Edo eventually to the east, and the Tōkaidō and Nakasendō roads converging through the gap. Whoever held this corridor was always going to be in a position to unify the country.
All three of the unifiers (Nobunaga, Hideyoshi, Ieyasu) came out of this corridor. So did the senior retainers who served them across forty years. If you want to understand the geography of the Sengoku settlement, the place to start is a hotel in Nagoya and a JR pass.
I think about this when I walk these battlefields. Most of them are quiet now. Children play on the swings at Hachimanbara. Office workers eat lunch under the cherry trees at the Sekigahara central monument.
Farmers grow rice in the paddies of Anegawa and Sekigahara and turn up the occasional bullet during the autumn ploughing. The transition from violent strategic ground to ordinary modern landscape is almost complete.
What remains is the road network the unifiers left behind, the castle towns that became modern cities, the legal frameworks of land tenure that still shape Japanese property law, and a national habit of finishing arguments rather than letting them fester. That last one was worth nine battles to acquire. The Japanese have spent four centuries trying not to need to fight a tenth.
If you found this useful, you may also want to read about the major figures who fought these wars: Oda Nobunaga, Toyotomi Hideyoshi, Tokugawa Ieyasu, Takeda Shingen, Uesugi Kenshin, Honda Tadakatsu, Sassa Narimasa, Takenaka Hanbei, and the strategist behind much of Hideyoshi’s planning. The era they lived through was the Sengoku era, which dissolved into the brief, brilliant Azuchi-Momoyama era as Nobunaga and Hideyoshi reshaped the country. Castles still standing from that period include the original keeps documented in Japan’s 12 Original Castles and the lost grandeur of Azuchi Castle, the building Nobunaga raised at the height of his ambition before it burned.
